Tampilkan postingan dengan label Home decoration. Tampilkan semua postingan
Tampilkan postingan dengan label Home decoration. Tampilkan semua postingan
Minggu, 17 Februari 2013

Rabu, 06 Februari 2013
Striped decorative bed end cover (+ pattern)
A few months ago I came across this crochet bedspread at the Purlbee website which looked modern and didn't have this old fashion crochet feeling. And this sparked the idea of not making a bedspread but one of those small bedcovers, which you usually find at the end of your bed in those fancy hotels, to bring some warmth and personality to your room.
Well, I have tried to create the same feeling back home. I have worked with grey and beige as these are the main colours in my apartment but of course you can give it any twist you want.

PATTERN:
Crochet hook 5
Total Length: approximately 1m65
Total Width: approximately 50cm
I lost track of count, but I think with around 450 gr you should be able to finish this bed end cover.
Stitch count is a multiple of 3, plus 3 stitches.
#Main colour : grey yarn
Chain 111
Row1: 1 double crochet (dc) into 3rd chain from hook, *skip 2ch, 3 dc into next ch* repeat until the end, turn
Row2: 3ch (count as 1dc), 1 dc into very first stitch, [3 dc into next space between dc groups] repeat till last space, 2 dc into last space and then 1 dc into 3rd stitch of ch 3 from previous row.
Repeat Row2 23 more times.
Insert colour: beige yarn
Base Row Insert colour: 1 single crochet (sc ) into each dc till end, turn
Finish Row Insert colour: 1 sc into each sc till end.
Repeat from # 5 more times, and finish off.

Senin, 04 Februari 2013

Minggu, 18 November 2012
Bathroom crochet bowl (+ pattern)
I bought some rope yesterday because I just wanted to try to crochet a little bowl. The pattern you will find in this blog post shows you how you can vary in diameter. But I just wanted to have a bowl for the bathroom to store some little soaps that is why the diameter is around 14cm.
The rope I used is 2mm thick and not too stiff to work with. But for a thickness of 2mm I have used hook size 6.
Hope you'll like it :-) .

PATTERN:
Ch 5 on hook size 6 mm and form a ring with 1 sl st in first ch.
Row1: ch 1, 2sc in same ch *2sc in every ch* finish with 1 sl st in first ch
Row2: ch3, 2hdc in next sc *1hdc in next sc and 2hdc in following sc * finish with 1 sl st in 3rd ch from beg of round
Row3: ch3, 1hdc in next hdc, 2hdc in following hdc * 1hdc each in the next 2hdc's, 2hdc in the following hdc * finish with 1 sl st in 3rd ch from beg of round
Row4: ch3, 1hdc in next hdc, 1hdc in next hdc, 2hdc in following hdc * 1hdc each in the next 3hdc's, 2hdc in the following hdc * finish with 1 sl st in 3rd ch from beg of round
Row5: ch3, 1hdc each in the next 3hdc's, 2hdc in following hdc * 1hdc each in the next 4hdc's, 2dc in the following hdc * finish with 1 sl st in 3rd ch from beg of round
Row6: ch3, 1hdc each in the next 4hdc's, 2hdc in following hdc * 1hdc each in the next 5hdc's, 2hdc in the following hdc * finish with 1 sl st in 3rd ch from beg of round
Depending on the diameter of your bowl you keep repeating Row6.
Once the diameter is big enough you will keep repeating next Row.
Row... : ch3, *1hdc in the next hdc* finish with 1 sl st in 3rd ch from beg of round
Once you have reached the desired height...
Fasten off.


Selasa, 13 November 2012
Make your own crochet coasters (+ pattern)
I know that these coasters are not so special but often simple is the best and goes with any trendy, modern interior. I have found this yarn (beige) surrounded by this thin dark brown yarn. The 2 together create this special effect and make this simple coaster even look special.
TIP:
You could actually make your own yarn, you choose a basic colour, for example white and you can double crochet it together with any colour sewing thread. You will see that it will give this great effect. You might not be able to find the colour to crochet but you can create your own by mixing the colours you like!!

PATTERN:
Row 1: Magic circle (click on this link to visit the you tube site)Row 2: ch 3, 9 dc inside magic circle, connect to top of ch 3 (10 dc)
Row 3: ch 1, 2 sc in each dc, connect to 1st sc (20 sc)
Row 4: ch 1, 1 sc in each sc , connect to 1st sc (20 sc)
Row 5: ch 3, dc in same stitch, dc in next stitch * 2 dc in next stitch, dc in next stitch * repeat and connect to top of ch 3 (30 dc)
Row 6: ch 1, 2 sc in same stitch, 1 sc in next 2 stitches * 2 sc in next stitch, 1 sc in next 2 stitches* repeat and connect to 1st sc (40 sc)
Row 7: ch 3, dc in same stitch, dc in next 3 stitches * 2 dc in next stitch, 1 dc in next 3 stitches* repeat and connect to top of ch 3 (50 dc)
Row 8: ch 1, 2 sc in same stitch, 1 sc in next 4 stitches * 2 sc in next stitch, 1 sc in next 4 stitches * repeat, connect to 1st sc and finish off.
Material used: Cotton
Dimension: 12cm ( 4.7 inch)
Stitches used:
ch = chain
sc = single crochet
dc = double crochet


Rabu, 07 November 2012
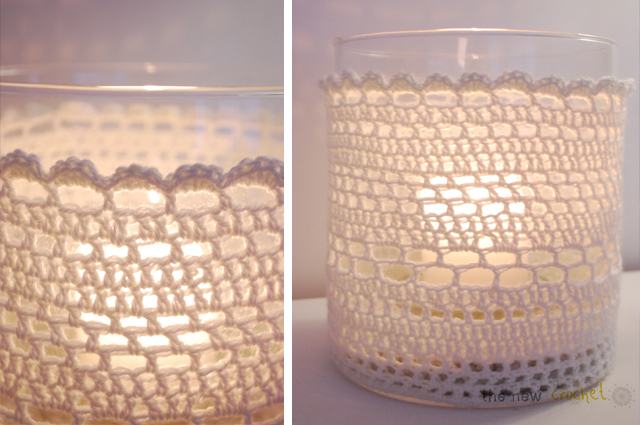
Crochet candle light cover
It is again that time of year where we are going to spend a lot of our time indoors. Colder temperatures are currently also arriving here in the South of France. It makes my hands itch ;-).
I just love to make it more cosy in my apartment. I like to adapt my home to my personal mood, even though my changes usually only last one season.
The other day I was searching the net and I am came accross this crochet pattern from Drops Design when it gave me the incentive to start this little project.
I have used the yarn I had at home which was 20% wool and 80% acrylic. It turned out exactly how I wanted it to be, a little bit more romantic due to the yarn. If I would have used cotton it would have been too cold for my taste.
I did not follow the pattern I found on Drops Design but I wanted to have a bit more 'open' work. Unfortunately I did not write down a pattern, but as the vase has a 20cm diameter I have started with 102ch and formed a ring with a slipstich. I kept track of the 102chains without decreasing or increasing. I just made sure that the crocheted tube was 3 to 4cm lower than the actual size of the vase.
It felt a bit tight when I wanted to place it over the vase but like this it will perfectly keep its shape!!

Langganan:
Postingan (Atom)